

If you're selling a car in Victoria, Queensland or another state that requires a roadworthy certificate, you're probably already thinking about the inspection itself. But there's a step most sellers skip: photographing the RWC-relevant items before the inspection happens.
This isn't about documenting everything twice. It's about being smart with the photo session you're already doing for your listing. The same tyres, lights and brake components that matter to an inspector also matter to buyers, and having clear photos of them serves both purposes.
Taking roadworthy certificate photos Australia sellers often forget can save you arguments later. When a buyer asks about tyre tread or brake pad condition, you've got dated images to back up your claims. When an inspector passes your vehicle, you've got a visual record of exactly what state things were in.
Why Document Condition Before Your RWC
The gap between passing your roadworthy and actually selling can stretch to weeks or months. Tyres wear. Brake pads thin. Lights can fail. Without photos from the time of inspection, you've got nothing but your word when a buyer questions whether those tyres have done another 5,000km since the RWC.
More practically, if something fails during inspection, you'll want before-and-after evidence of repairs. This becomes useful if the buyer wants proof that work was actually done, or if you're negotiating a higher price because you've just fitted new brake pads.
The photos also protect you in disputes. If a buyer claims the car wasn't as described, dated images showing the exact condition at sale, including the stuff inspectors check, carry weight that vague descriptions don't.
Tyres, Brakes and Lights: How to Photograph Them Clearly
Inspectors focus on safety items. So should your documentation. Here's what to capture:
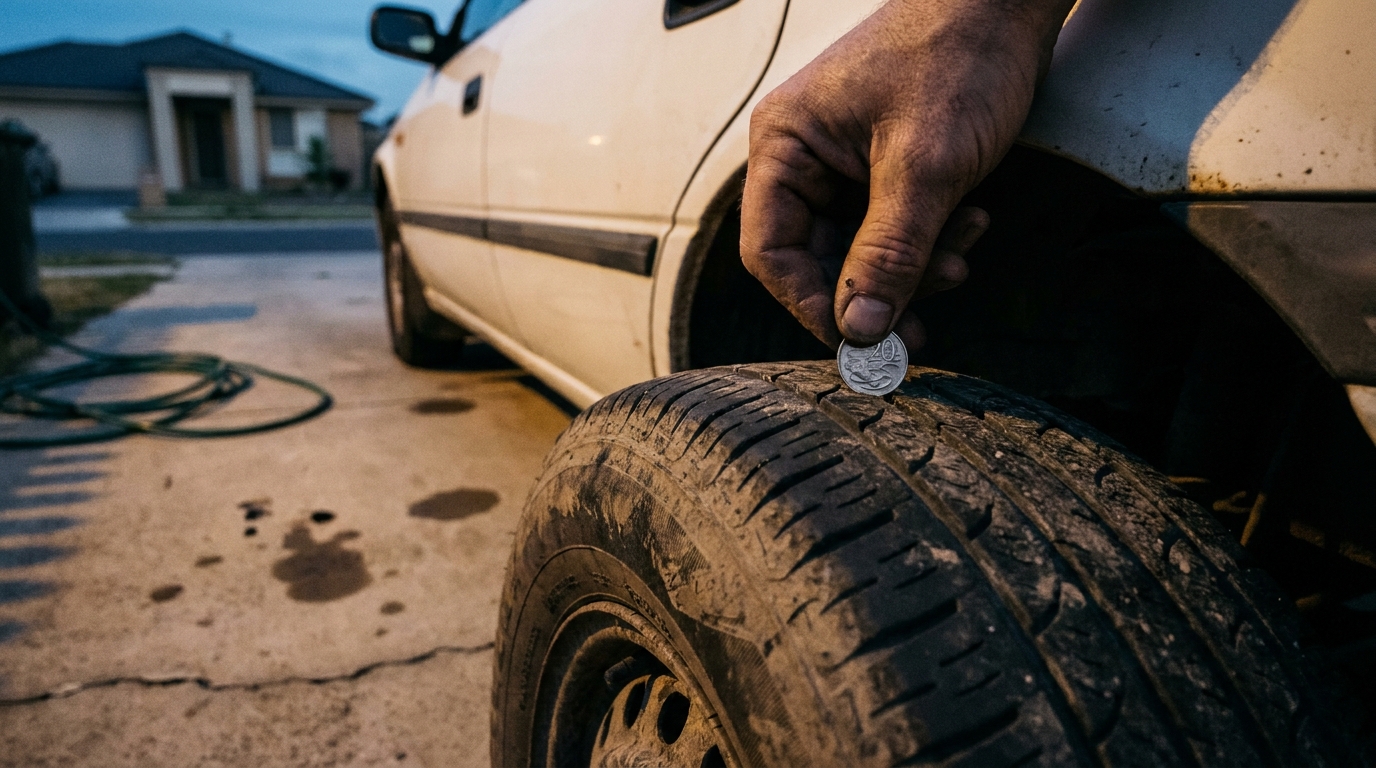
Tyres: Get down low and photograph each tyre's tread face-on, with something for scale, a coin in the tread groove works. Also capture the sidewalls for any cracking, bulging or damage. The tyre placard (usually inside the driver's door jamb) is worth a shot too, showing the specified pressures and sizes.
Brakes: Unless you're removing wheels, you won't get brake pad shots. But you can photograph the visible portion of brake discs through the wheel spokes. Look for obvious grooving or rust. If you've had recent brake work, photograph the invoice alongside the car.
Lights: Every light. High beam, low beam, indicators front and rear, brake lights, reverse lights, number plate lights. Turn them on and photograph them working. A helper makes this easier, one person in the car pressing pedals, one with the phone.
Windscreen: Photograph it from inside looking out, and outside looking in. Inspectors check for chips and cracks in the driver's line of sight. Document exactly where any damage sits.
Integrating RWC Shots Into Your Listing Photo Session
You're already planning a proper photo shoot for your listing. Adding RWC documentation takes an extra ten minutes, not a separate session.
Start with your standard hero shots, the angles buyers click on first. Then work around the car methodically, adding the technical shots as you go. When you're at each corner for your exterior photos, drop down and capture that tyre. When you're doing interior shots, flick the lights on and photograph the dash (checking for warning lights while you're at it).
The key is keeping two mental lists: what buyers want to see, and what inspectors check. There's significant overlap. Buyers care about tyre condition too. They want to know the windscreen's clear. The difference is framing, your listing shots show the car looking its best, while your documentation shots capture specific details clinically.
For your actual listing, you probably don't need all these technical shots. But having them ready means you can share them when asked, rather than scrambling to take photos of already-worn tyres weeks after the sale conversation started.
Using These Photos in Buyer Negotiations
When a buyer messages asking about tyre condition, sending a clear photo with a coin showing tread depth ends the conversation faster than typing paragraphs. It's harder to lowball someone who can prove exactly what they're selling.
Some sellers include these photos directly in their listings. Platforms like Carsales, Gumtree and Facebook Marketplace have different image limits, but most allow enough that you can include a few technical shots alongside your standard angles.
Others keep them in reserve. The listing shows the car looking clean and appealing, and the detailed condition shots come out during serious enquiries. Either approach works, it depends whether you want to filter tyre-kickers early or cast a wider net initially.
If you're using Cardabra to clean up your listing photos (removing background clutter, blurring plates), your RWC documentation shots probably stay as-is. You want those clinical and unedited, showing exactly what exists. The line between helpful editing and misleading photos matters here, documentation photos should be honest records, not polished marketing.
What Inspectors Check vs What Buyers Want to See
Inspectors run through a standardised checklist: steering, suspension, brakes, tyres, lights, windscreen, seatbelts, structure. They're looking for safety defects, not cosmetic issues.
Buyers care about all of that plus the stuff inspectors ignore: paint condition, interior wear, whether the air con works, service history. The RWC tells them the car won't kill them. It doesn't tell them whether it's actually worth buying.
This is why your photo documentation needs both layers. The RWC-relevant shots prove safety and mechanical condition. Your standard listing shots sell the car as a desirable purchase. Neither replaces the other.
A passed roadworthy doesn't mean much if your listing photos are cropped too tight or missing key angles. And beautiful hero shots don't answer practical questions about whether the tyres will pass inspection.
Document both. Use both. Sell the car with confidence because you can back up every claim.
FAQ
Do I need to include RWC photos in my car listing?
You don't have to, but having them available for serious buyers speeds up negotiations. Most sellers include standard exterior and interior shots in their listing, then share detailed RWC-relevant photos privately when asked. This keeps your listing visually appealing while proving you've documented the mechanical condition properly.
What should roadworthy certificate photos Australia sellers capture?
Focus on the items inspectors check: tyre tread depth and sidewall condition, brake discs visible through wheels, all lights working, windscreen clarity, seatbelts, and any structural areas you can photograph. Date-stamp these or take them on the same day you photograph the car for your listing, so you have a clear timeline.
How do I photograph tyre tread depth for documentation?
Place a coin (a 20-cent piece works well) into the main tread grooves and photograph it straight-on at tyre level. This gives a visual reference for depth that's harder to dispute than just saying "good tread." Do all four tyres, including a shot of each sidewall to show no cracking or damage.
Can I edit my RWC documentation photos?
Keep your RWC documentation shots unedited. These exist as honest records of condition, not marketing material. While cleaning up backgrounds on your listing hero shots is fine, your technical documentation should show exactly what exists, good and bad, so you're protected if disputes arise later.
The listing photos are a different job from the documentation photos. For those, rebuilding the background while keeping the car's condition untouched is exactly what Cardabra's processing is built for, and Car Photo Editing That Keeps the Dents explains the standard it applies.
Turn your phone snaps into showroom-grade listings.
Upload a photo, pick a background, and Cardabra returns a polished listing image in about 30 seconds.